AVID CAD Animation Mini Case Study: 6
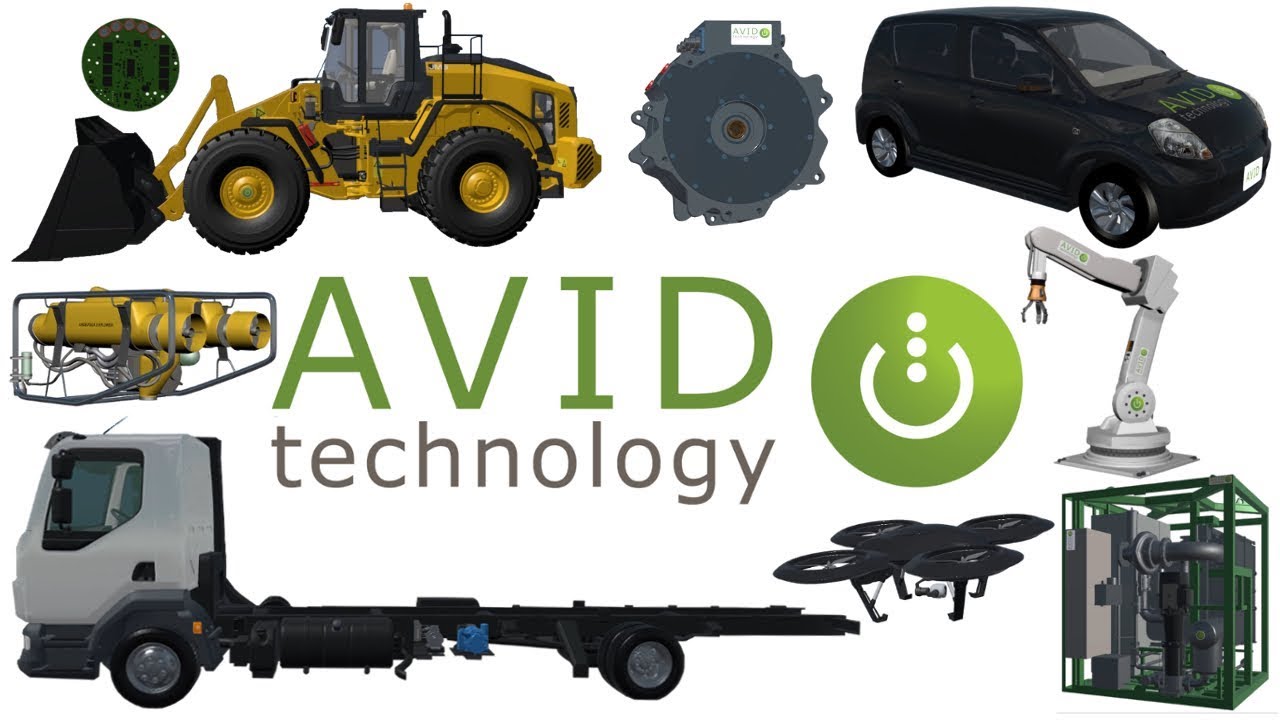
AVID EV Powertrain | Robotics | Aerospace | Renewable Energy
This CAD animation is the broadest of all the animated videos TL Multimedia has made for AVID. It’s effectively a whole company service offering overview. So there are some parts from previous CAD animations and also some new CAD and contextualised models (such as the flying drone, robot arm and sub-sea ROV.
Viewers of our previous animation about AVID’s EV power-train capabilities will recognize that, on the surface, it appears to be a re-edit of that video. This is not the case, and in fact editing that video to save on costs was considered but it was clear it wouldn’t easily work. This is because the image sequence/rendered videos did not fit the timing of what now needed to be said in Ryan’s voice over. So it isn’t a simple video re-edit: the power-train parts of this video are re-timed animation segments which is a very different thing altogether.
Sidebar: No Part Of The Animation Process Is As Easy as it Looks!
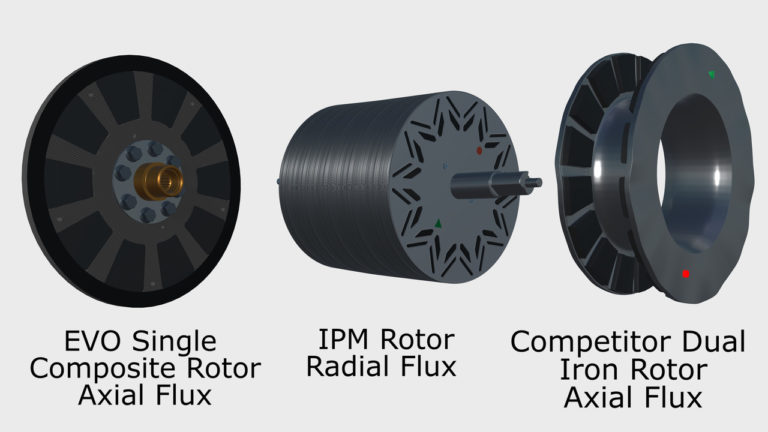
A typical CAD animation for a even a single product, such as the EVO Motor, can be quite complex to plan, design and execute. The reason for this is largely obvious: complex systems with many parts are by nature not simple and so neither is animating them. If the task were simple then animation would probably not be required. Just record a video of someone dis-assembling and re-assembling your product and you’re done! And that’s precisely what we do in making the animation: disassemble and re-assemble the entire product so it can be seen flying apart in just a few seconds. Of course this isn’t as laborious a process as doing the same with the physical product. But it isn’t a 3 second, 3 minute or even 3 hour task.
We have to make sure the parts come out in the right order. We also make them move at a speed which both get’s them ‘out of the way’ quick enough but not too quickly. If you just let the CAD animation software apply the default motion curves, then this often results in dissatisfying motion. What does this mean? One issue is that things can move so fast they are only shown moving for 3, 2 frames or even just one frame. That means they pretty much just disappear which doesn’t give enough information to the viewer. Move things too slow and things draaaaaag and it doesn’t feel fluid. This is actually more important than it seems. If you have a well-oiled and fluid motion product and you want to give that impression over to a viewer, the last thing you want is jerky and slap dash animation.
Another motion control problem we often have to solve is that some parts will need to move at different speeds to depending on their importance. And so if you have things flying apart at different speeds, again the animation software is likely to calculate the motion in unpredictable ways. What then happens is objects moving at different speeds pass through other objects in the assembly/disassembly. We are presenting physical objects which are both solid and generally mechanical, it doesn’t feel right to have them pass through one another in an unrealistic manner. So we have to edit the motion curves and tweak them so both the speed looks right and the effective result doesn’t break the realism.
Complications of Layered Rendering of CAD Animations
Another thing you will notice, if you look carefully for even a few seconds of our CAD animation work, is that we also animate the camera. In fact we animate it almost all the time if we can. In the EVAD video you will see that the entire car/power-train rig is moving through the environment the whole time. The camera is connected to this rig but it also has it’s own sub-set-rig (as do the various parts). Now we can do things with cameras in our CAD animation software that you just can’t practically do in the real world, but we generally don’t want the camera to move in a way which makes the viewer get motion sickness. This is the same problem as described above but it effects everything on screen instead of just one part. So a large amount of the camera motions are carefully timed and re-timed for finesse in the normal process of animating the camera.
As you can see we have again made various parts of this animation ‘pop-out’ not only in 3D space but also we fade away the background items. And when I say ‘background’ I mean items which are, depending on the moment, foreground items and then become background items. Imagine trying to shuffle a deck of cards and at the same time pull out the right card in the middle of your shuffle, for 5 for 6 different right cards. So basically the simplest and fastest solution is to have everything on its own render layer. But when you do that you might have something, like the cooling pack, which is ordinarily ‘in front’. So if you have a motor ‘pop-out’ from behind that it needs to start behind and end up in front. Yes that’s a complicated idea. Yes it’s complicated to manage the whole event. It generally requires 2 of everything. And basically this literally takes 2 brains to do. So for the render set-up we have to sit 2 people together and plot out when things will appear/disappear. And it’s essential that one of those 2 people are the post-production compositor so that they know what the heck is going on with all these different rendered layers. When one person tries to hold all these complexities together by themselves it just becomes a super slow process. I can testify to this as I was that one person and I could not track and manage all the parts in my head at the same time.
If I’ve lost you in complexity right now then I don’t blame you. But see if you can follow me here. These multi-object render layers are structured so that there is one long render of the whole piece, but at various points the key-foreground part just disappears in one frame. At that point a duplicate of that part appears on it’s own layer at the same exact time. It does it’s thing and then goes back and the swap happens again when it’s back where it belongs. These separate objects are rendered on their own and then re-assembled back in by the compositor in After Effects or some other package. Then in the compositing package we can blur out/fade away the background to fully showcase the the foreground object. And we have to do this for every object we highlight.
So you can probably understand why I made the decision to completely remove the environment and make the power-train/car stay still for the duration of this. And there is a segment of this re-version in which the camera and parts stay-put and the highlighting is done in After Effects in 2D post. This still requires a (comparatively less) complex masking process but it was a compromise to prevent the project workload becoming too lengthy and therefore costly. We keep the “flying-out” layers and have re-timed all the motion so it’s a trade-off worth having.
Could It Not Be Done In An Easier Way? (I hear you!)
Perhaps, as mentioned we took some short-cuts with one segment but, when the camera is static for too long, it can get a bit boring. If you want your video to be viewed enthusiastically then don’t let it become boring. We might have optimised the process a bit with 3D rendered masking or other CGI tricks. However, those sorts of processes require time to set up and create more work on the post-production side. So there’s a risk you can actually take more time trying to save time. And this is why Hollywood CGI costs a fortune. We aren’t super cheap ourselves but we try not to cost a literal fortune to provide our services.
Get In Touch with TL Multimedia
If you want to ask me hard questions about these complexities you can get in touch via the TL Multimedia web site: tlmultimedia.co.uk/contact/